Question Types
TABLE OF CONTENTS
Create New Question
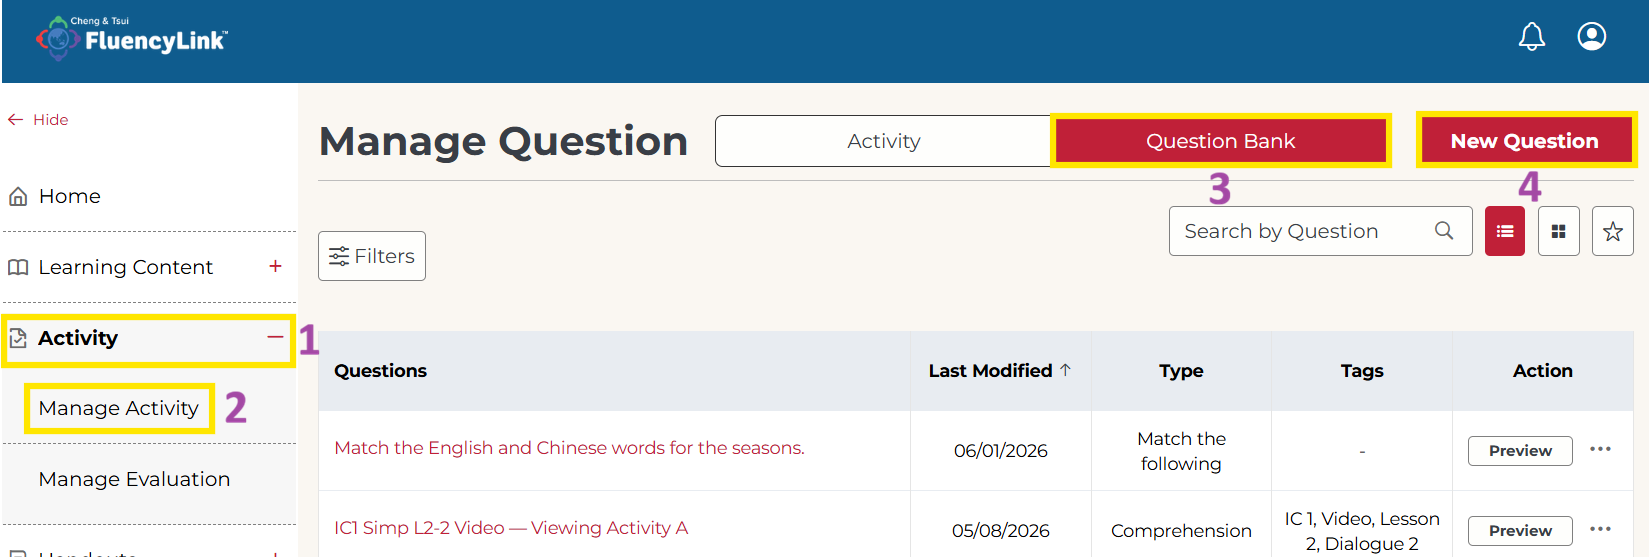 1. On the side menu panel, click Activity.
2. Click Manage Activity.
3. Click the Question Bank tab.
4. Click the New Question button.
Not what you see? Click to see the old UI view.
To create a new question, click New Question at the top-left of the Question Bank.

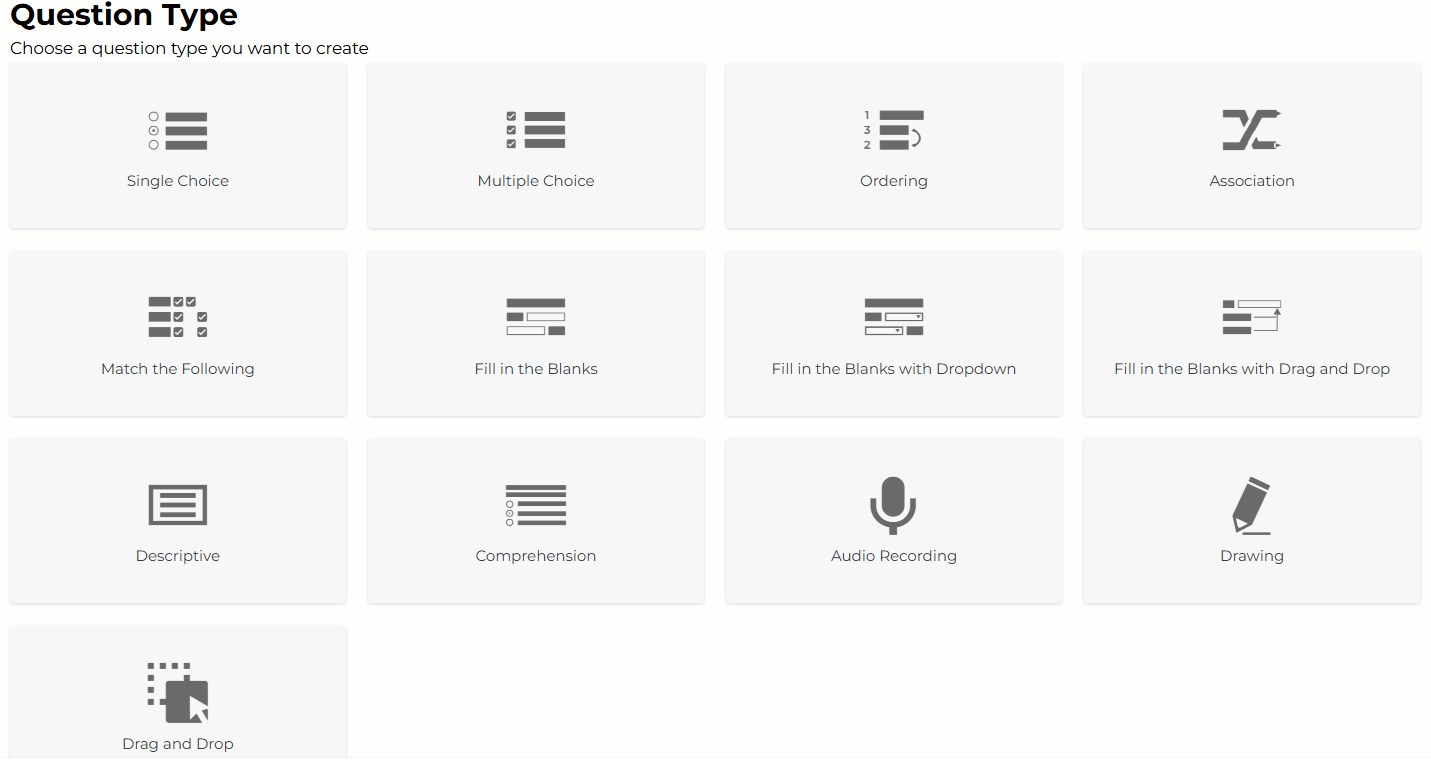
You will see the following question types to choose from.
Not what you see? Click to see the old UI view.

Auto-Graded Questions
Single Choice
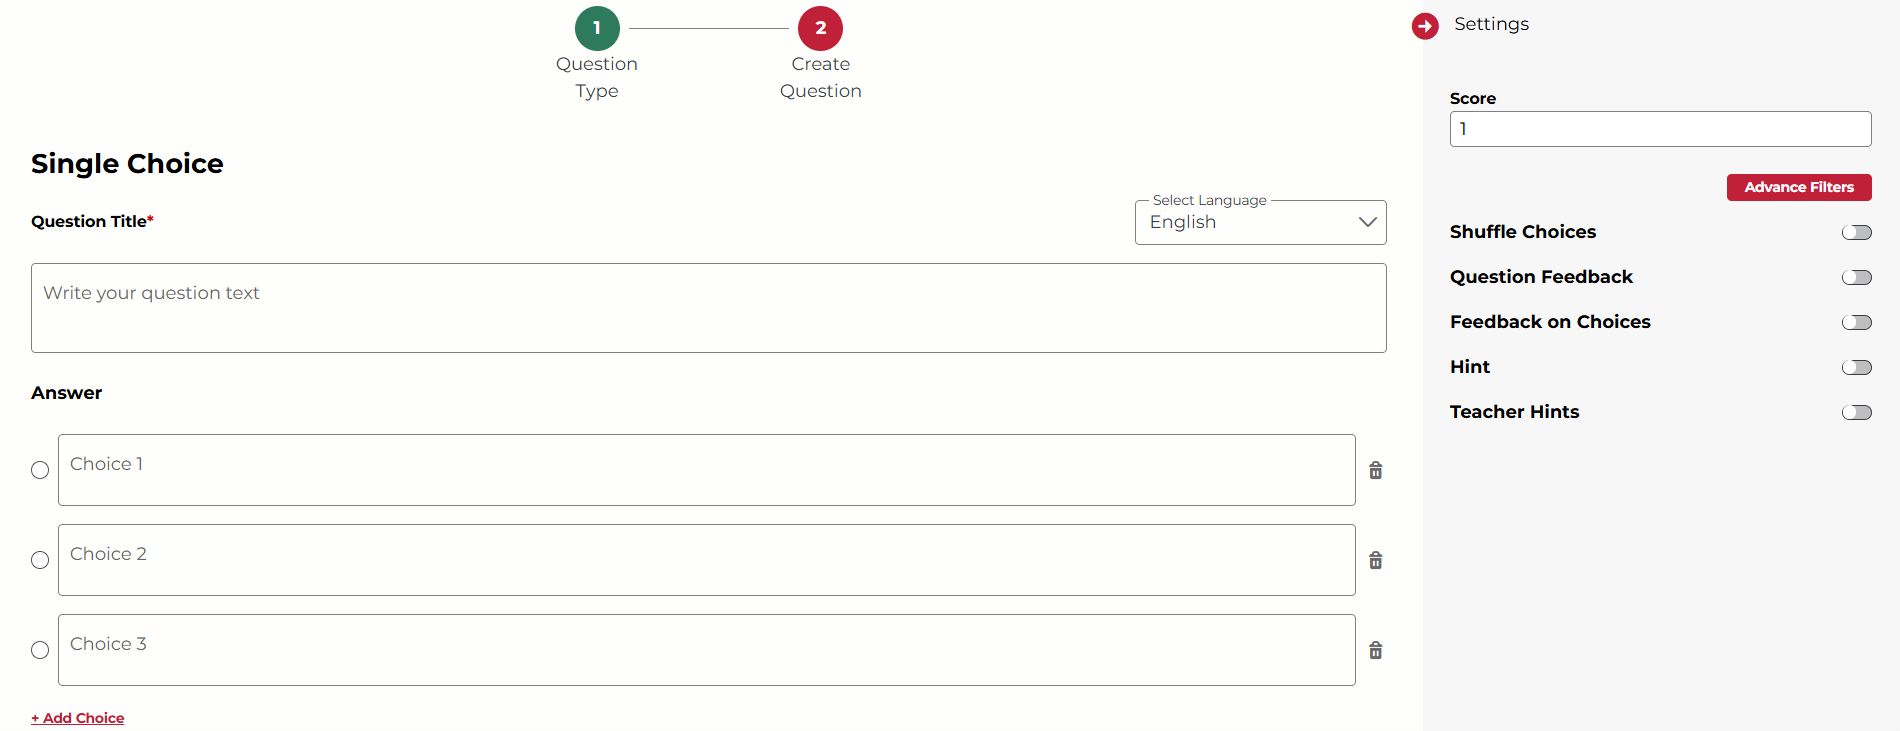
In a single choice type question, there is only a single correct answer, and the rest of the options are incorrect.
Not what you see? Click to see the old UI view.

1. Enter the question text and the choices in the space provided.
- You must add a minimum of 2 choices for each question.
- You can add more choices by clicking on the Add Choice button.
- Click on the trashcan icon next to each choice to delete it.
2. Select the correct choice by clicking on the round button on the left.
3. (Optional) Adjust the question settings on the right.
4. Click Save or the check mark ✔ to save your question.
Multiple Choice
In a multiple choice type question, there can be one or more correct answers.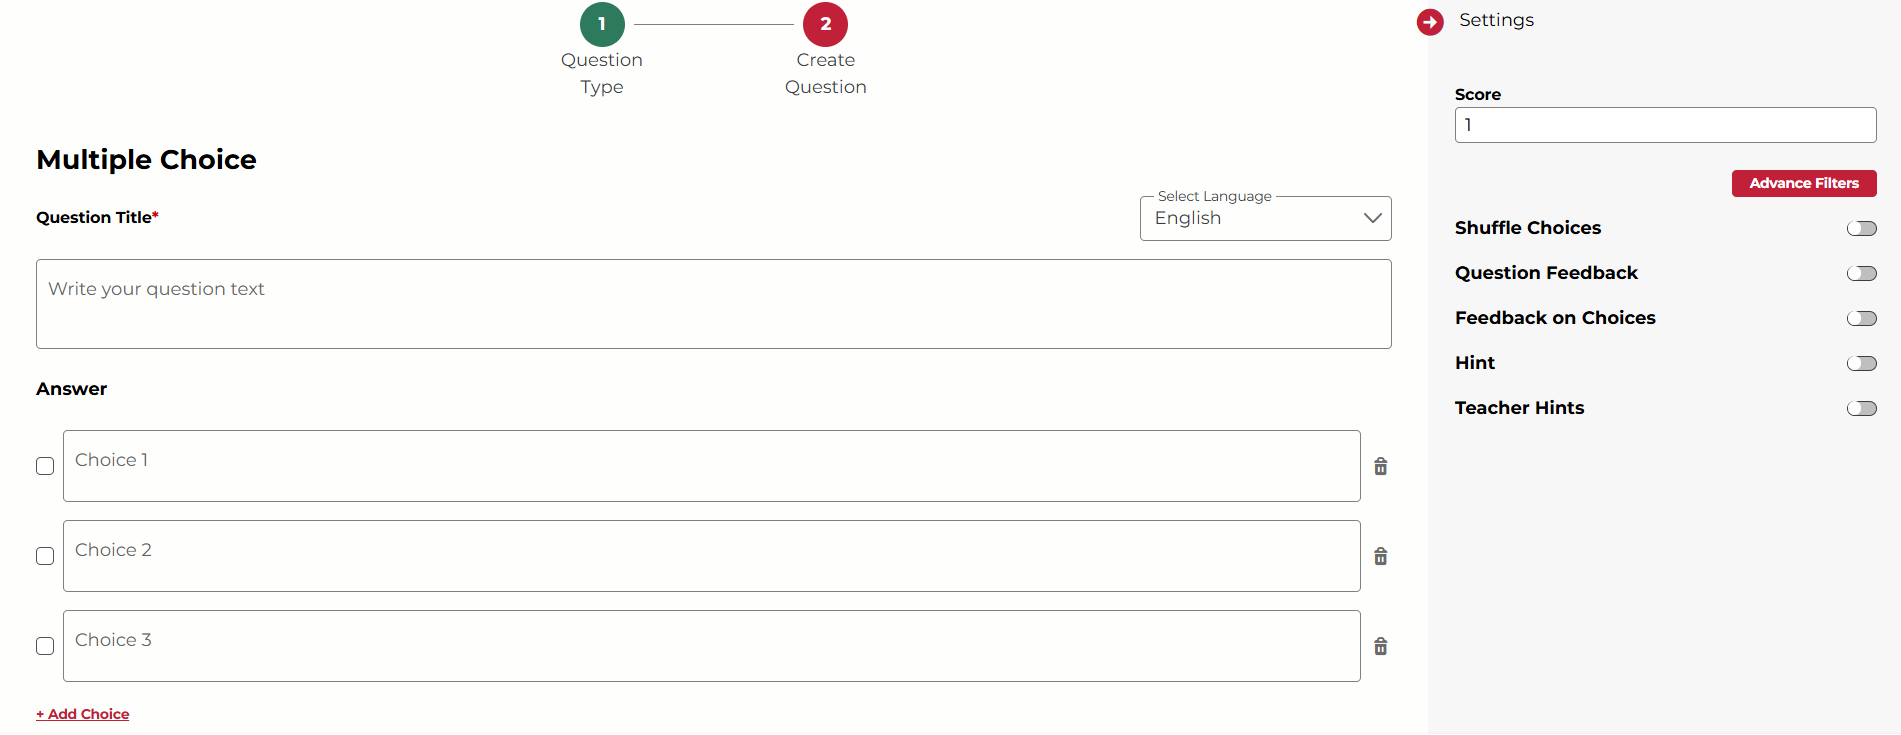
Not what you see? Click to see the old UI view.

1. Enter the question text and the choices in the space provided.
- You must add a minimum of 2 choices for each question.
- You can add more choices by clicking on the Add Choice button.
- Click on the trashcan icon next to each choice to delete it.
2. Select the correct choice(s) by clicking on the check box on the left of each correct choice.
3. (Optional) Adjust the question settings on the right.
4. Click Save or the check mark ✔ to save your question.
Ordering
Ordering questions require the student to rearrange a number of items into the correct order. This could be chronological or procedural, for example.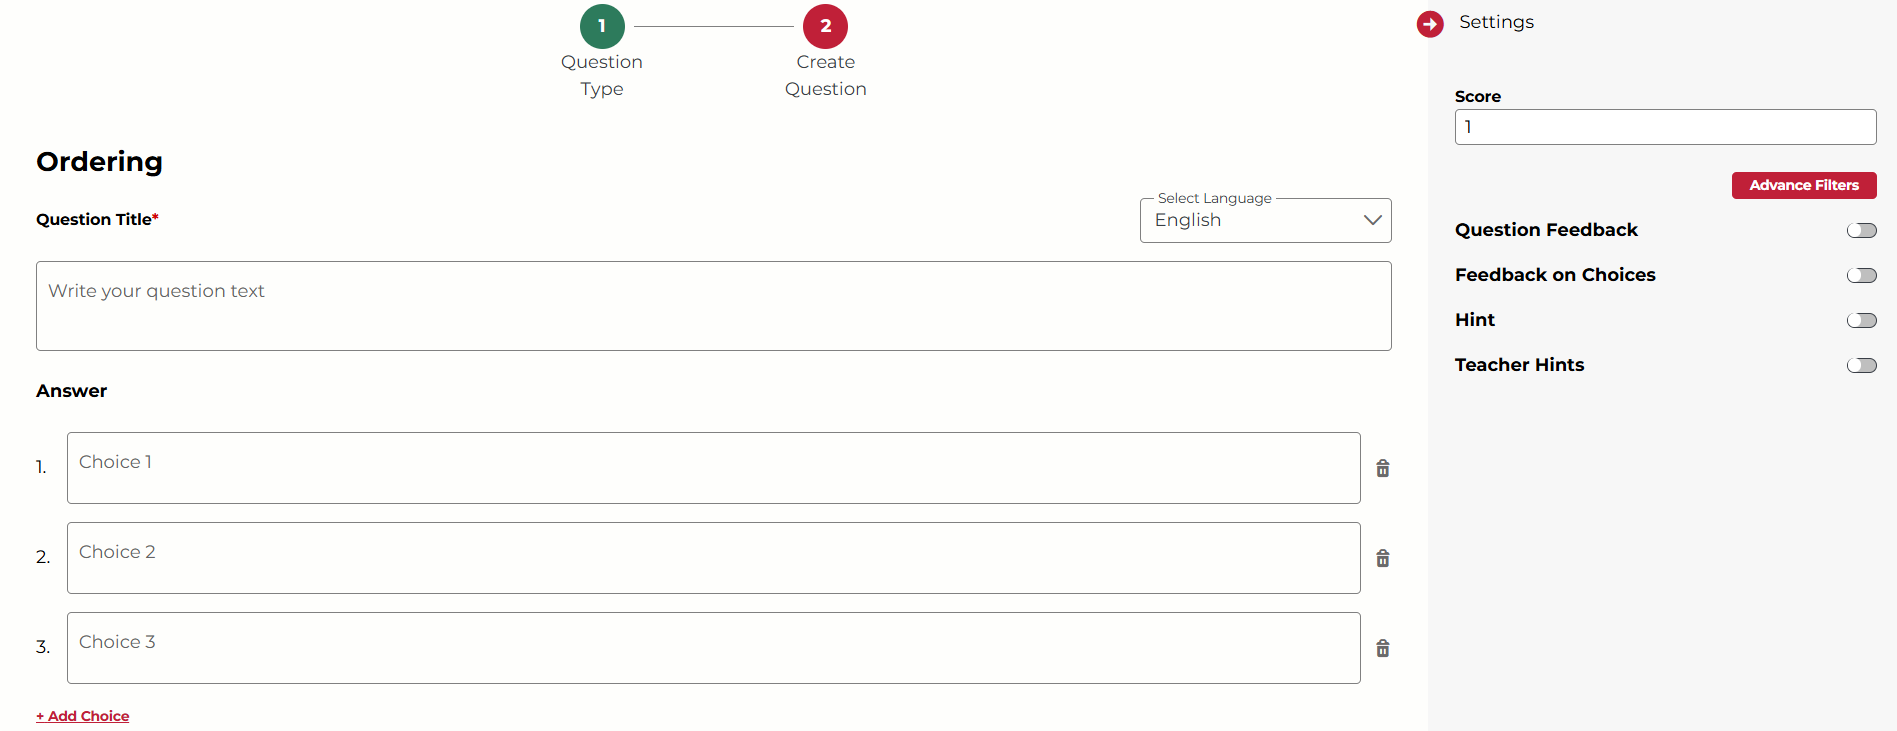
Not what you see? Click to see the old UI view.

1. Enter the question text and the choices in the space provided.
- You must add a minimum of 2 choices for each question.
- You can add more choices by clicking on the Add Choice button.
- Click on the trashcan icon next to each choice to delete it.
2. The numbers to the left of each choice indicate the correct order. Enter the choices in the correct order.
3. (Optional) Adjust the question settings on the right.
4. Click Save or the check mark ✔ to save your question.
Association
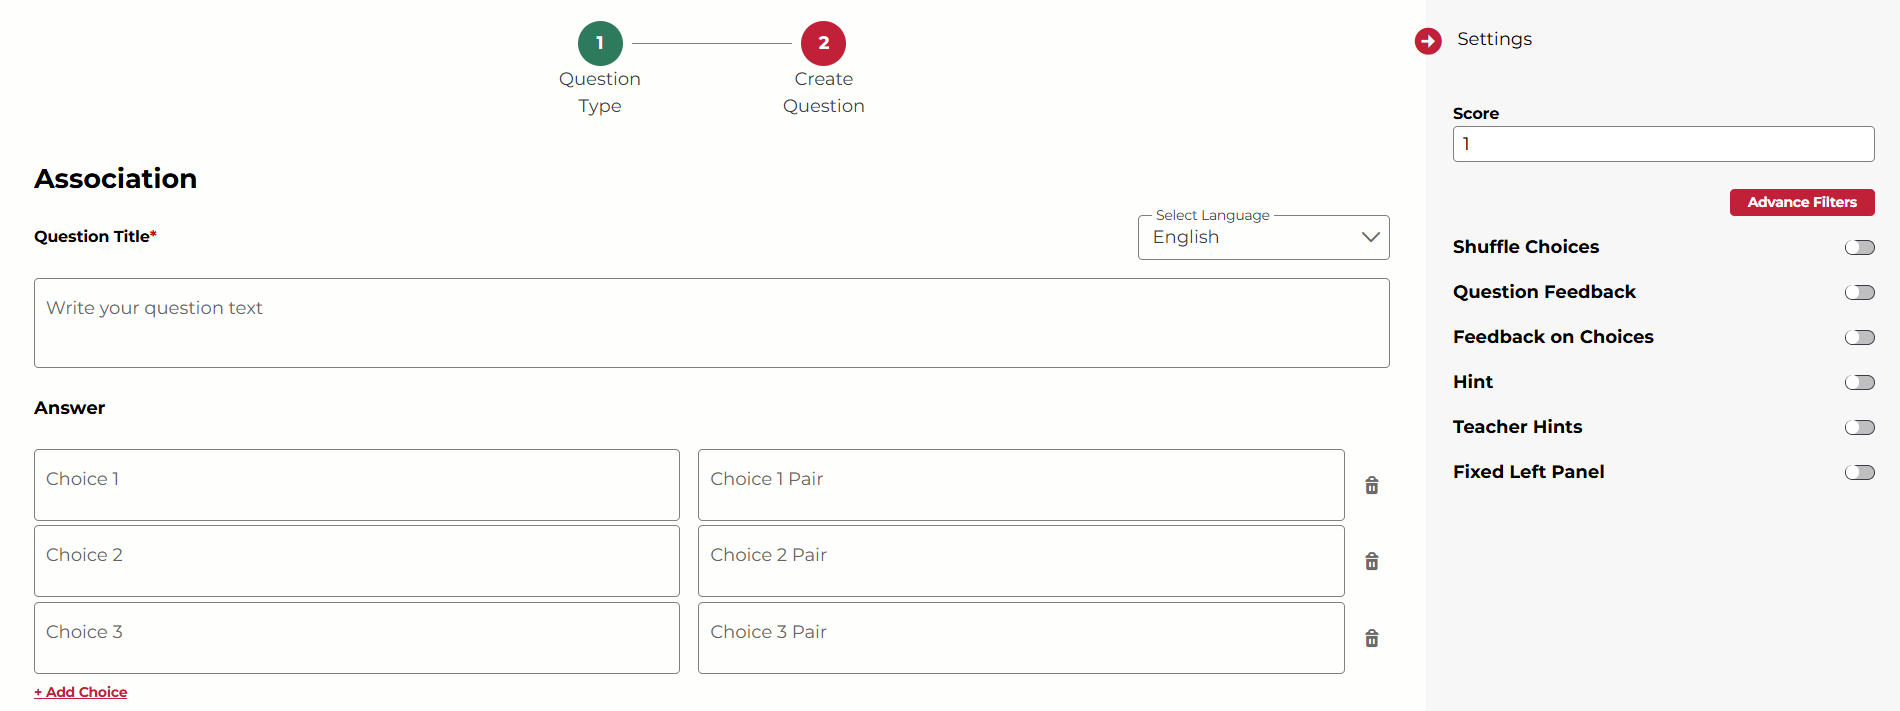
Association questions are used to match pairs of options. The response is deemed correct when the student has correctly matched all of the pairs.
Not what you see? Click to see the old UI view.

1. Enter the question text and the pairs of choices in the space provided.
- You must add a minimum of 2 choice pairs for each question.
- You can add more choice pairs by clicking on the Add Choice Pair button.
- Click on the trashcan icon next to each choice pair to delete it.
2. (Optional) Adjust the question settings on the right.
- Turn on Fixed Left Panel to freeze the order of the left-side choices. Students will only need to match and drag the right-side choices.
3. Click Save or the check mark ✔ to save your question.
Match the Following
Match the following question provides rows and columns. The student is required to "match" the correct row choices and column choices.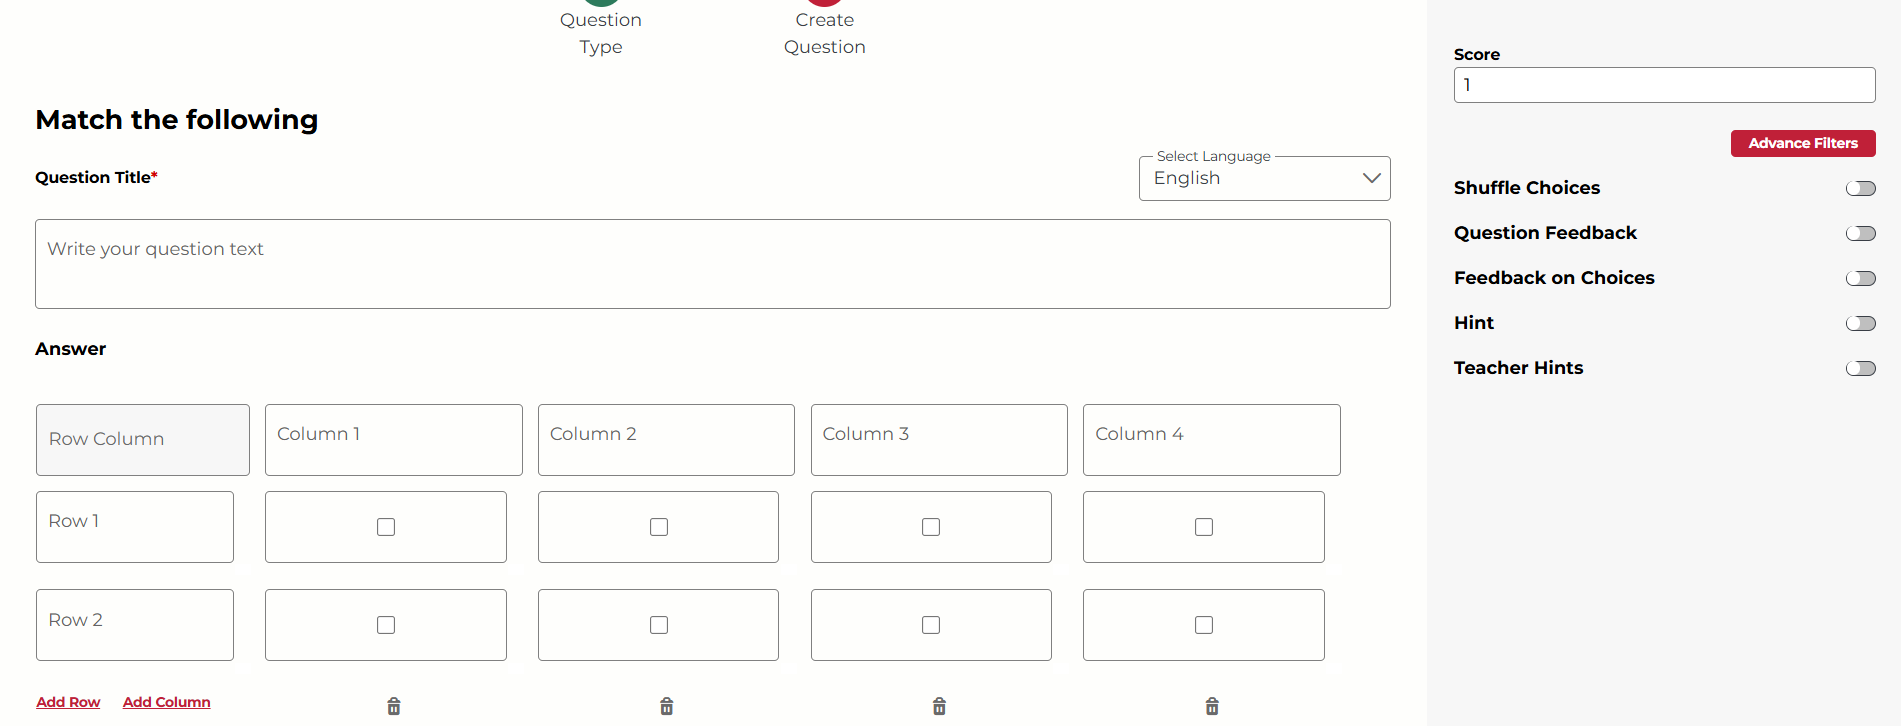
Not what you see? Click to see the old UI view.

1. Enter the question text and the row and column text in the space provided.
- You must add a minimum of 2 rows and 2 columns for each question.
- You can add more rows and/or columns by clicking the Add Row or Add Column buttons.
- Click on the trashcan icon to the right of each row or below each column to delete it.
2. Click on the checkboxes to select the correct matches for the row choices and column choices.
3. (Optional) Adjust the question settings on the right.
4. Click Save or the check mark ✔ to save your question.
Fill in the Blanks
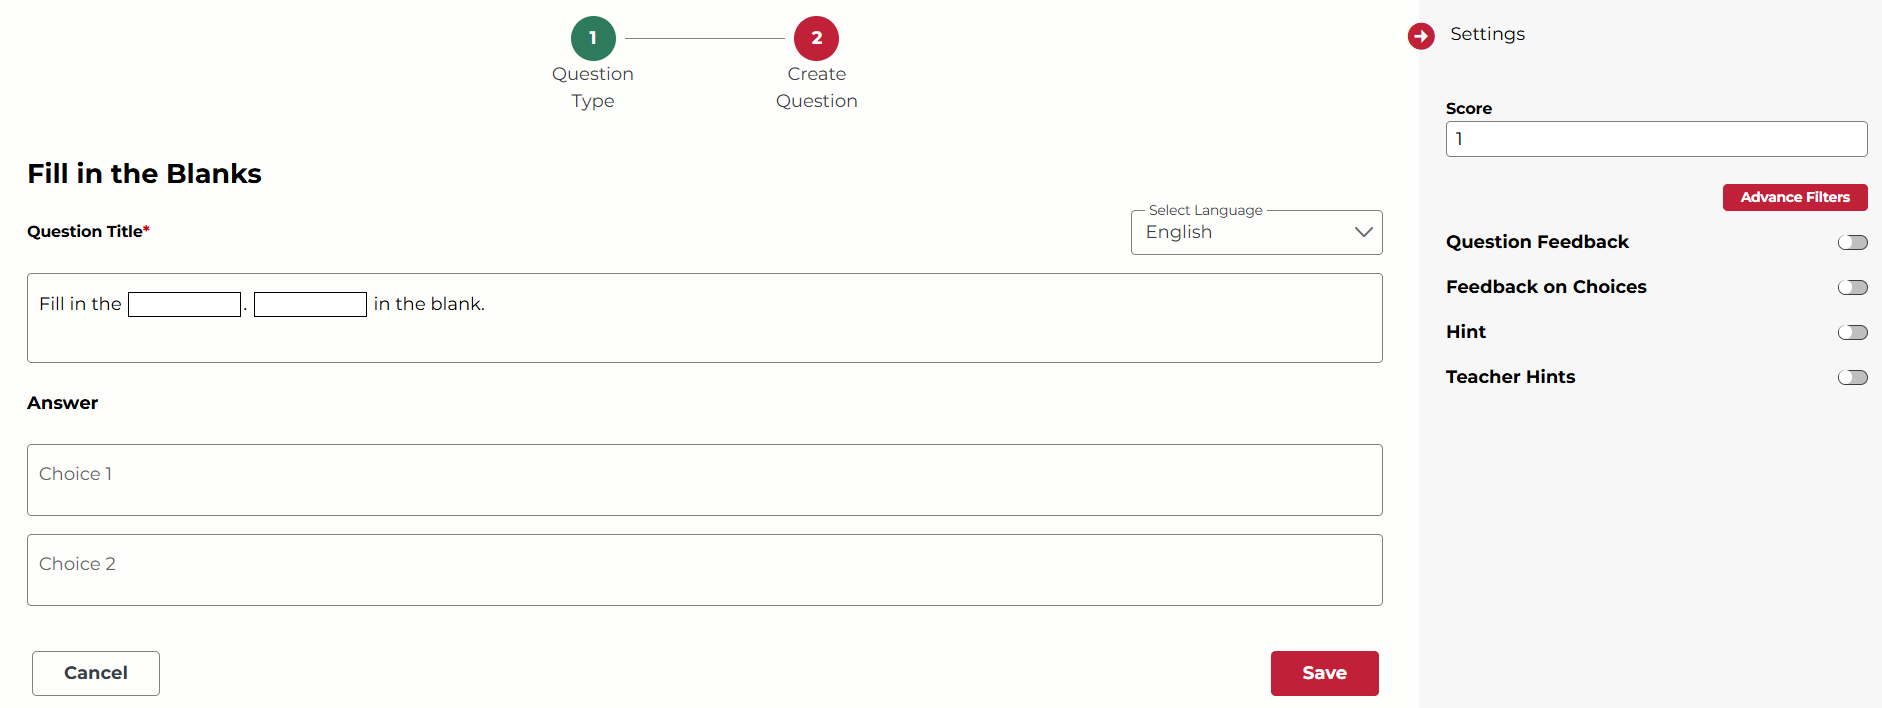
Fill in the blank questions require students to type the missing word or phrase. You can create a question with a single blank or multiple blanks. Each blank can only have a single correct answer. You can provide feedback for the whole question (question level feedback) or each blank (choice level feedback).
Not what you see? Click to see the old UI view.
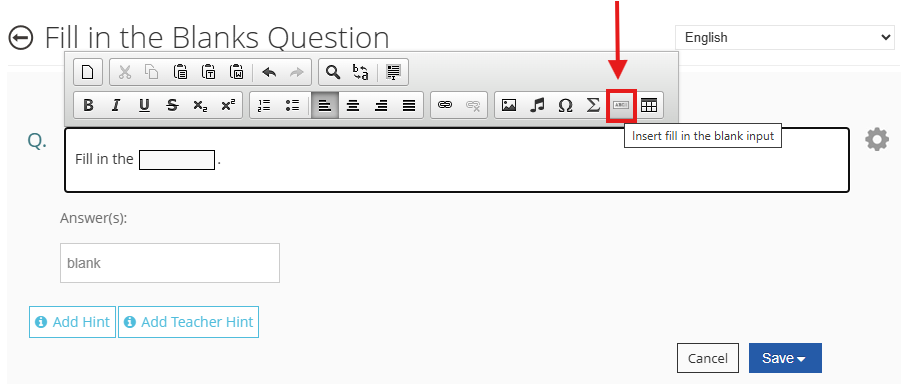
1. Enter the question text in the space provided.
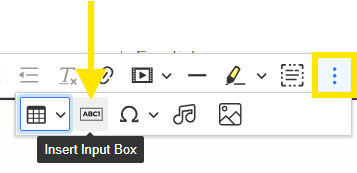
2. While using the text editor, insert one or more blanks by clicking on the Insert Input Box icon (or Insert Fill in Blank Input icon).
- You must insert at least one blank field for each question.
- Use the backspace key on your device to delete a blank field.
3. Enter the correct words/phrases in the answer boxes that appear below.
4. (Optional) Adjust the question settings on the right.
5. Click Save or the check mark ✔ to save your question.
Fill in the Blanks with Dropdown
Fill in the blank with dropdown questions require students to select the missing word or phrase from the drop-down list. You can create a question with a single blank or multiple blanks. There is only a single correct answer for each blank.
Not what you see? Click to see the old UI view.
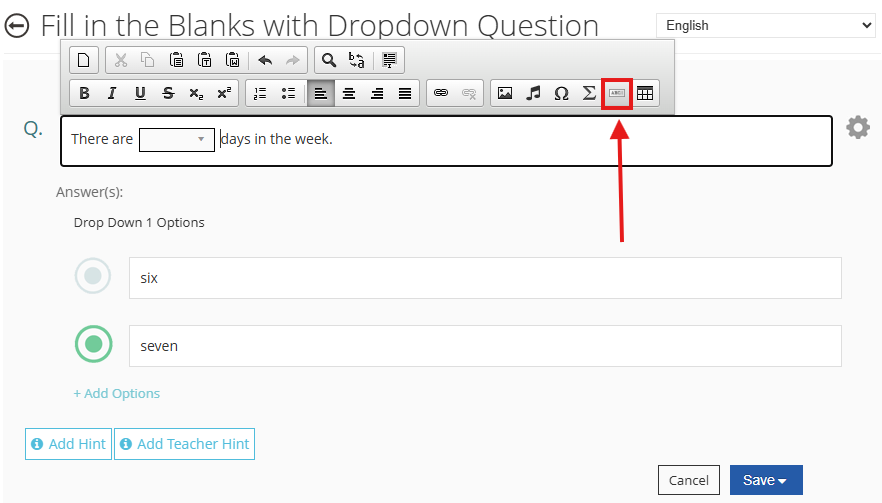
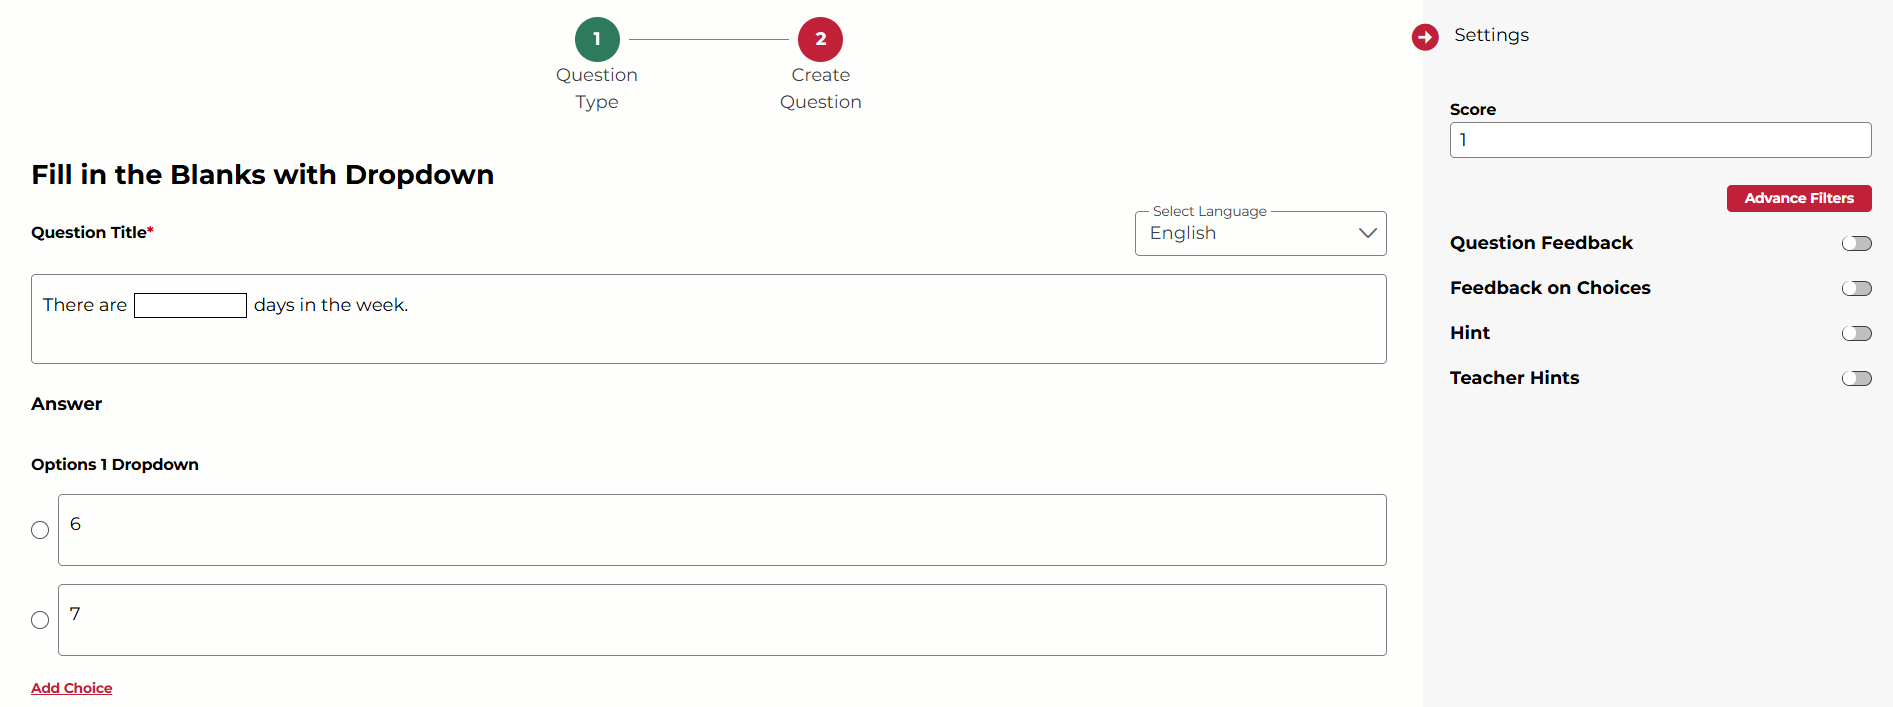
1. Enter the question text in the space provided.
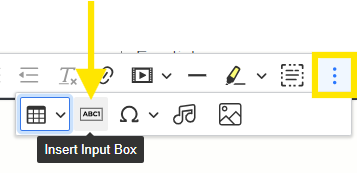
2. While using the text editor, insert one or more blanks by clicking on the Insert Input Box icon (or Insert Fill in Blank Input icon).
- You must insert at least one blank field for each question.
- Use the backspace key on your device to delete a blank field.
3. Enter the dropdown choice options for each blank in the answer boxes that appear below. The student will click on the dropdown in each blank and select the answer from the dropdown list provided here.
4. Click on the round button to select the correct answer from the dropdown.
5. (Optional) Adjust the question settings on the right.
6. Click Save or the check mark ✔ to save your question.
Fill in the Blanks with Drag and Drop
Fill in the blanks with drag and drop questions require the student to drag the missing word or phrase from the options list to the blank space. You can create a question with single or multiple blanks. There is only a single correct answer for each blank. You can provide feedback on the entire question (question level feedback) or each blank (choice level feedback).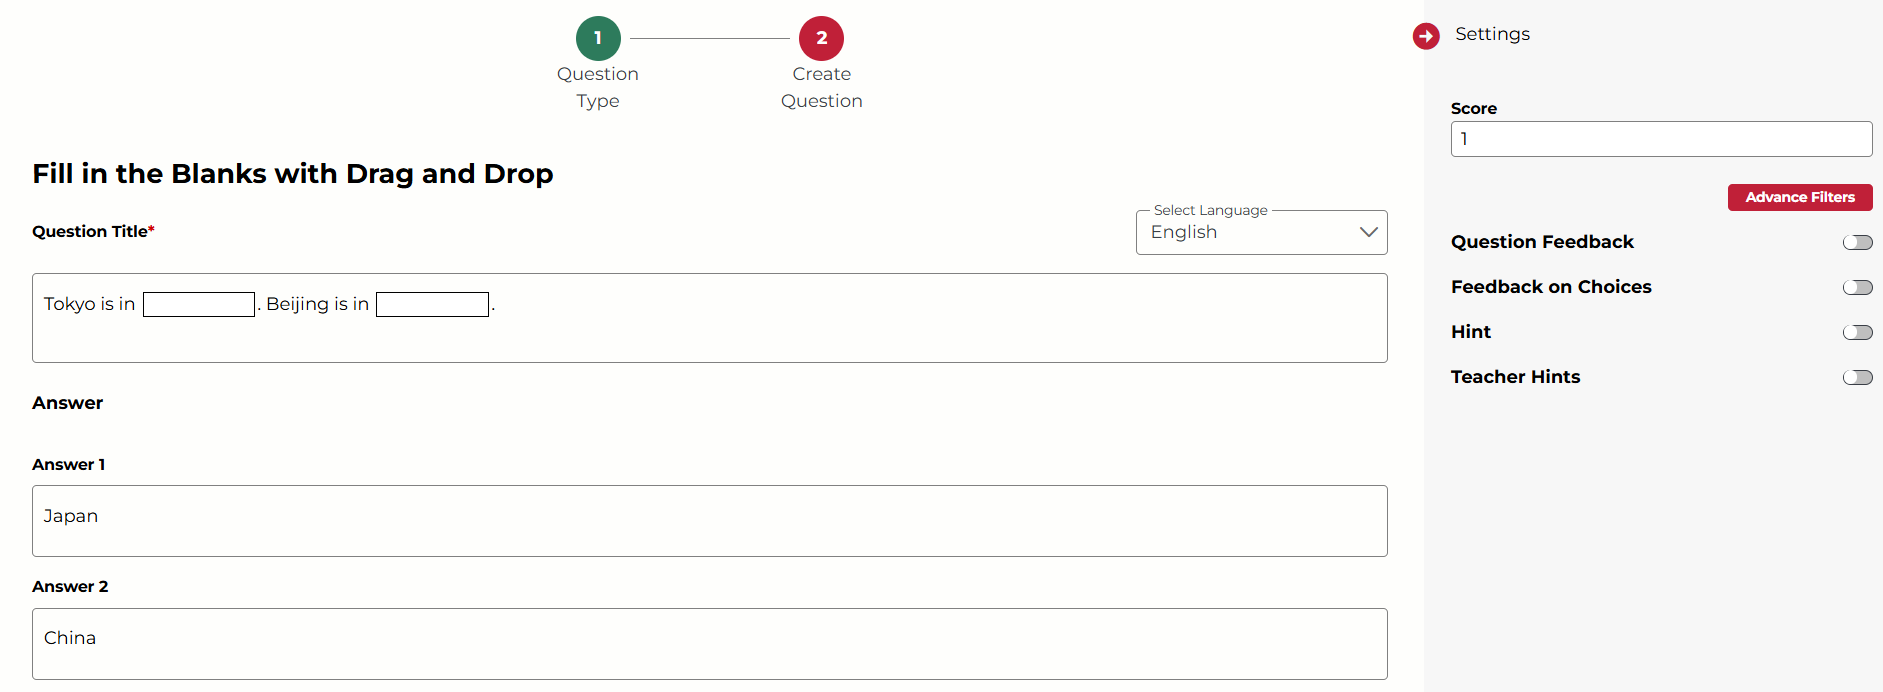
Not what you see? Click to see the old UI view.
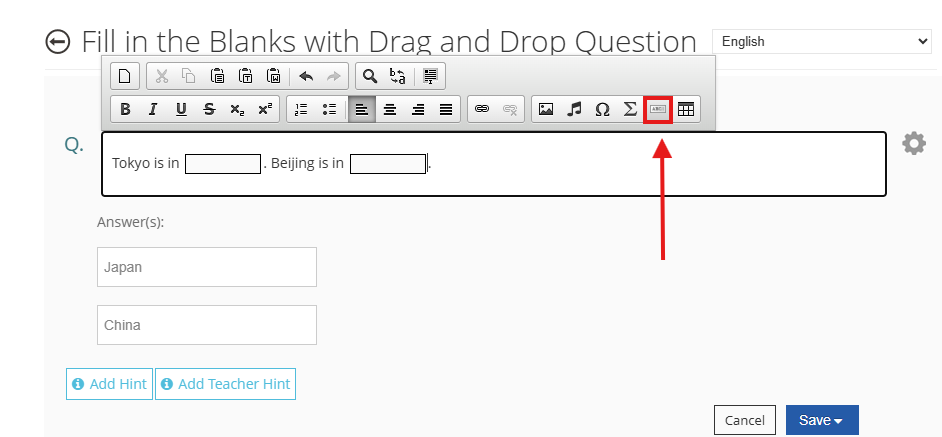
1. Enter the question text in the space provided.
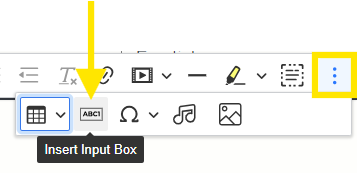
2. While using the text editor, insert one or more blanks by clicking on the Insert Input Box icon (or Insert Fill in Blank Input icon).
- You must insert at least one blank field for each question.
- Use the backspace key on your device to delete a blank field.
3. Enter the correct word/phrase in the answer boxes that appear below. The student will drag the answer options and drop them in the blank spaces provided in the questions.
4. (Optional) Adjust the question settings on the right.
5. Click Save or the check mark ✔ to save your question.
Manually Graded Questions
Descriptive
Descriptive questions are open-ended questions that must be manually graded. The answers could be in the form of a list, a single word, a few sentences, a paragraph, or an essay. You can provide feedback on each question (question level feedback) for descriptive type questions.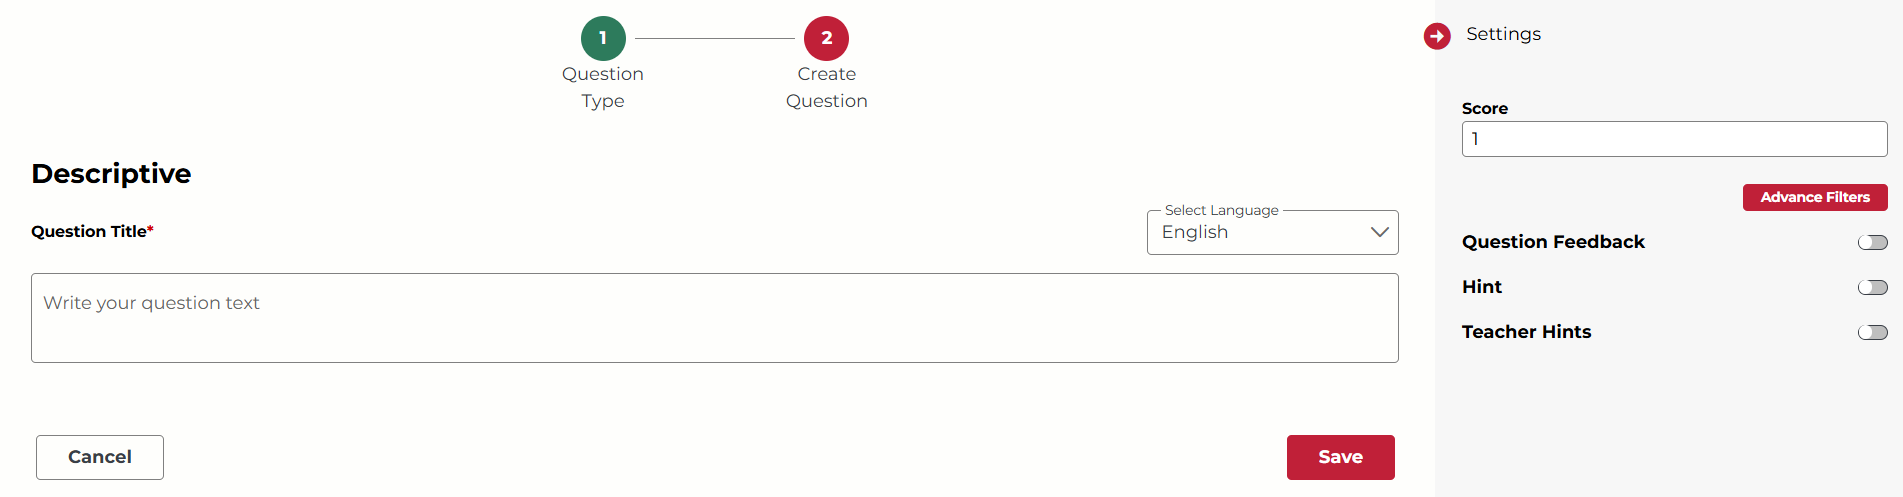
Not what you see? Click to see the old UI view.

1. Enter the question text in the space provided.
2. (Optional) Adjust the question settings on the right.
3. Click Save or the check mark ✔ to save your question.
Audio Recording
Audio recording questions allow the students to record their speech. These questions must be manually graded. You can provide feedback on each question (question level feedback) for audio recording type questions. Students will be able to listen to their recordings, delete, and re-record as many times as they like before submitting their recording. 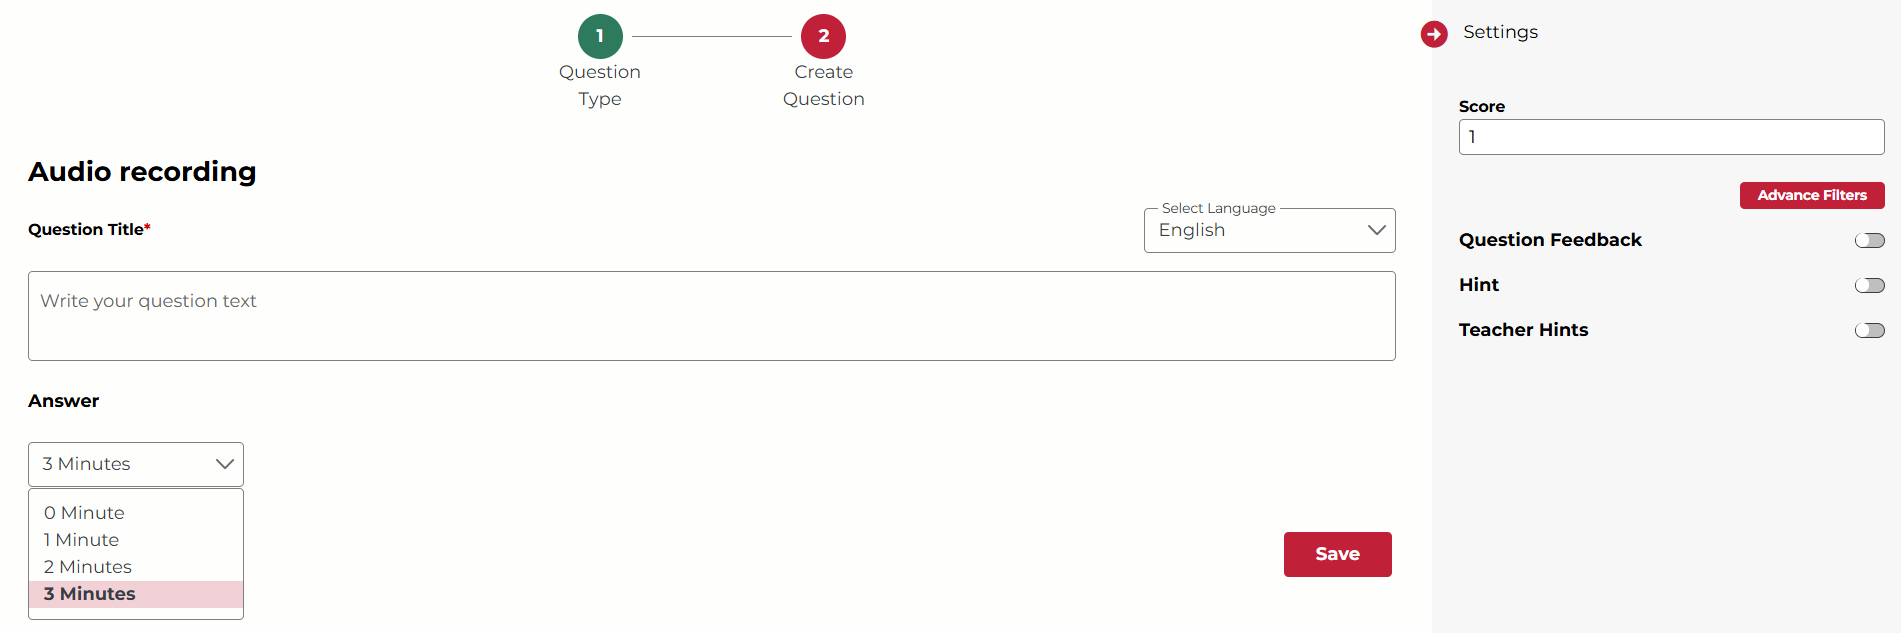
Not what you see? Click to see the old UI view.

1. Enter the question text in the space provided.
2. Choose the recording time limit from the drop-down list.
3. (Optional) Adjust the question settings on the right.
4. Click Save or the check mark ✔ to save your question.
Drawing
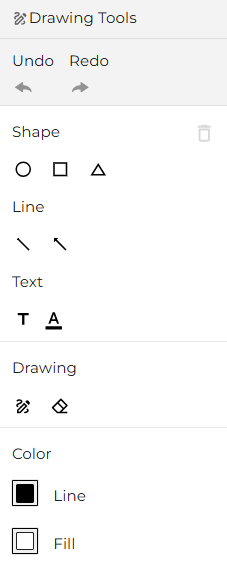
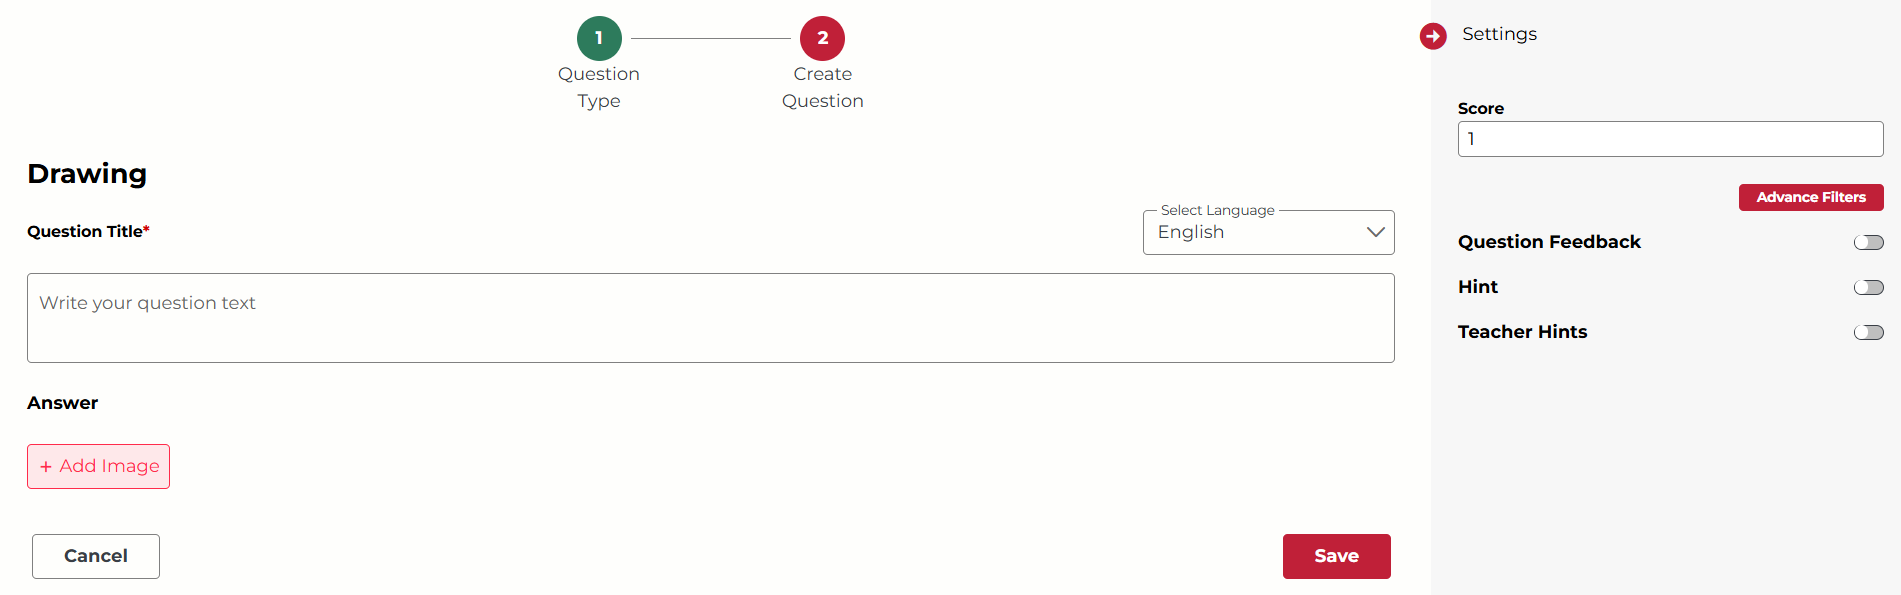
Drawing questions are open-ended questions that must be manually graded. Students will be able to use drawing tools to respond. You can provide feedback on each question (question level feedback) for drawing type questions.
Below are the drawing tools students will see for this type of question:
Not what you see? Click to see the old UI view.
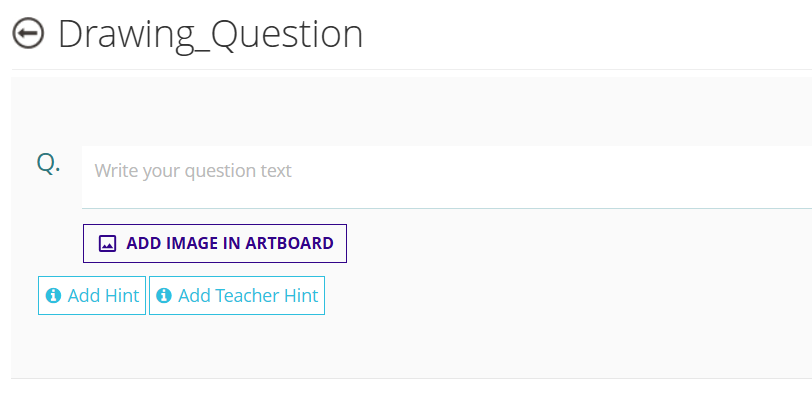
1. Enter the question text in the space provided.
2. (Optional) Click Add Image in Artboard to upload an image. The image will serve as the background for students to draw on. If you do not upload an image, they will see a blank template.
3. (Optional) Adjust the question settings on the right.
4. Click Save or the check mark ✔ to save your question.
Drag and Drop Image
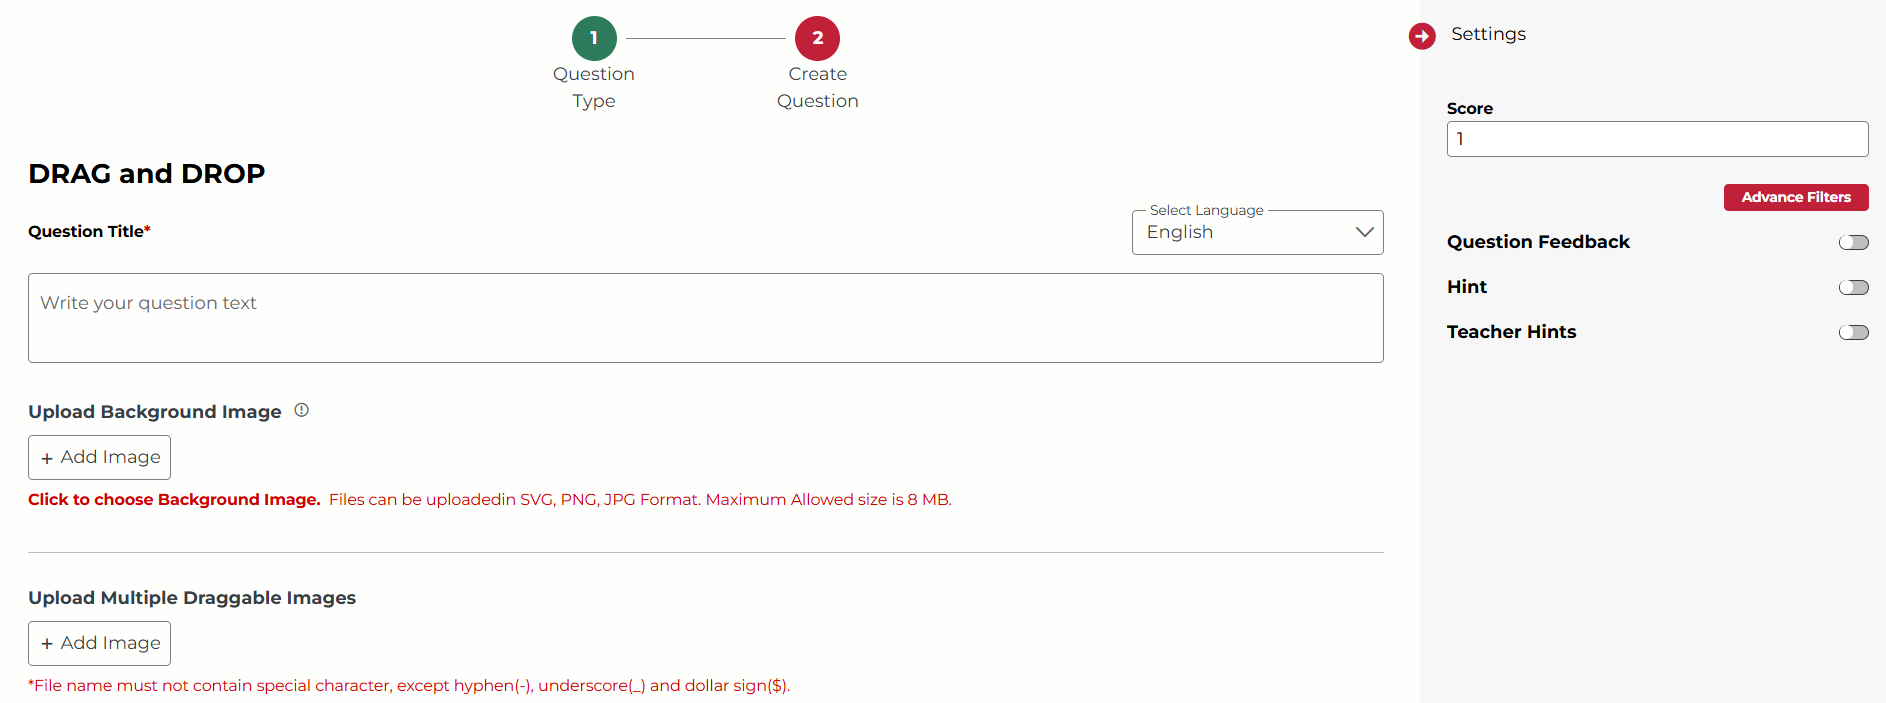
Drag and drop image questions allow the student to drag small images from the options list to complete the background image. They will also have drawing tools available, as shown above. These questions must be manually graded. You can provide feedback on each question (question level feedback) for drag and drop image type questions.
Not what you see? Click to see the old UI view.
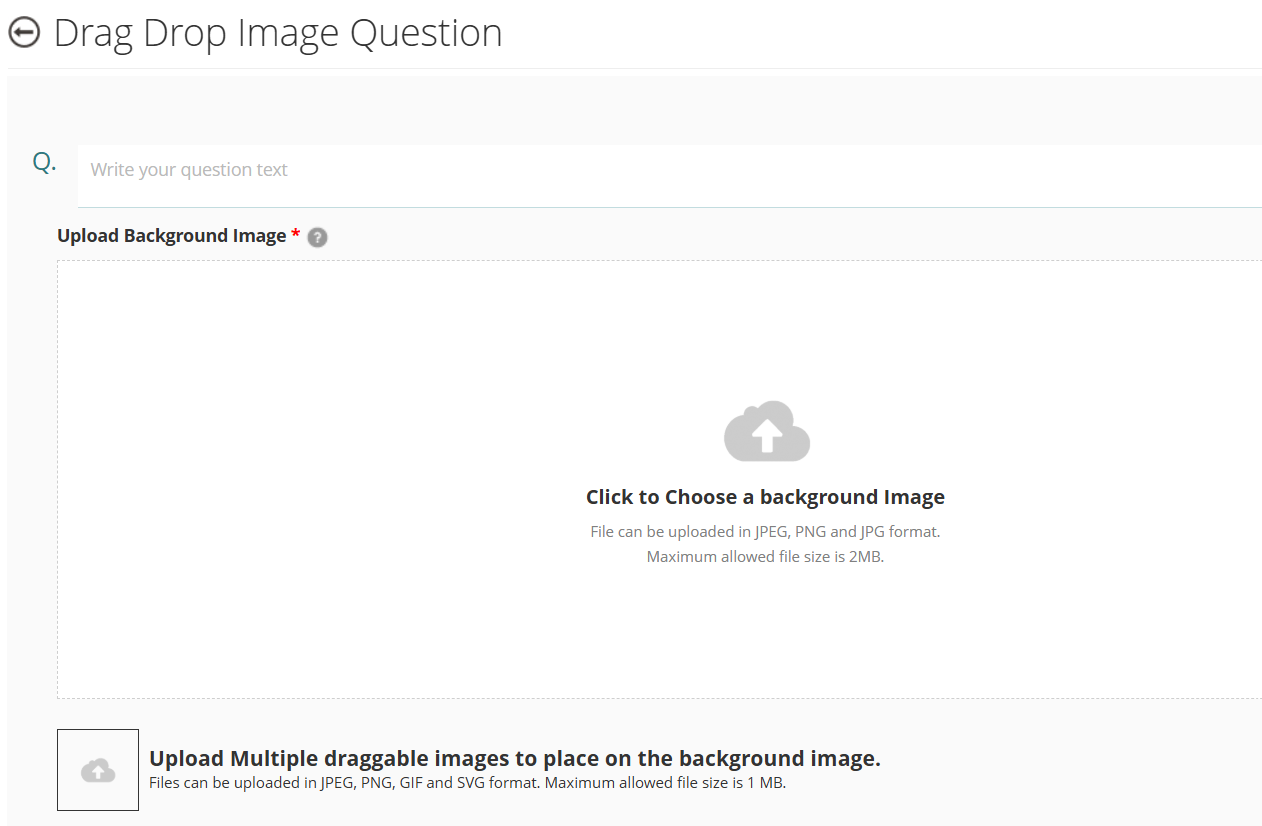
1. Enter the question text in the space provided.
2. Upload a background image in JPEG, SVG, or PNG format.
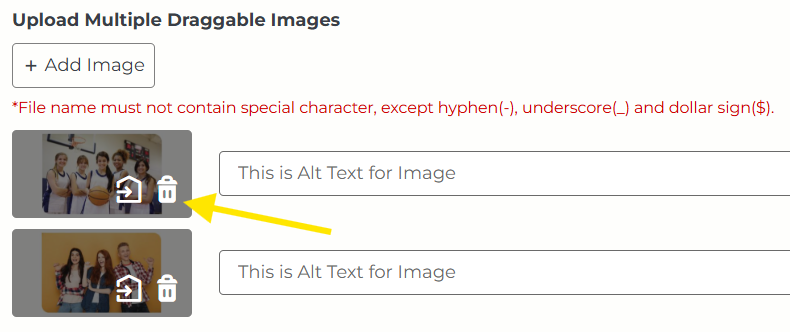
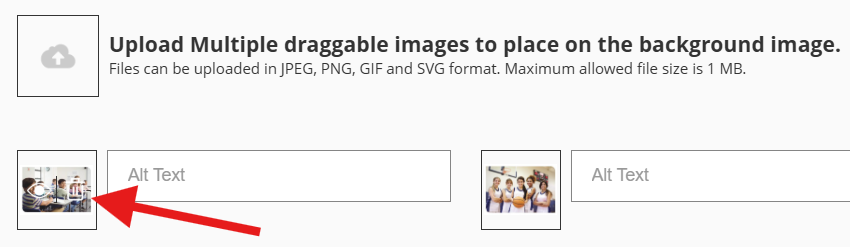
3. Upload one or more draggable small images in JPEG, PNG, GIF, or SVG format. Students will drag and place these images on the background image.
- To delete one of the draggable images, hover over it with your cursor. You will see a white trashcan icon.
Not what you see? Click to see the old UI view.
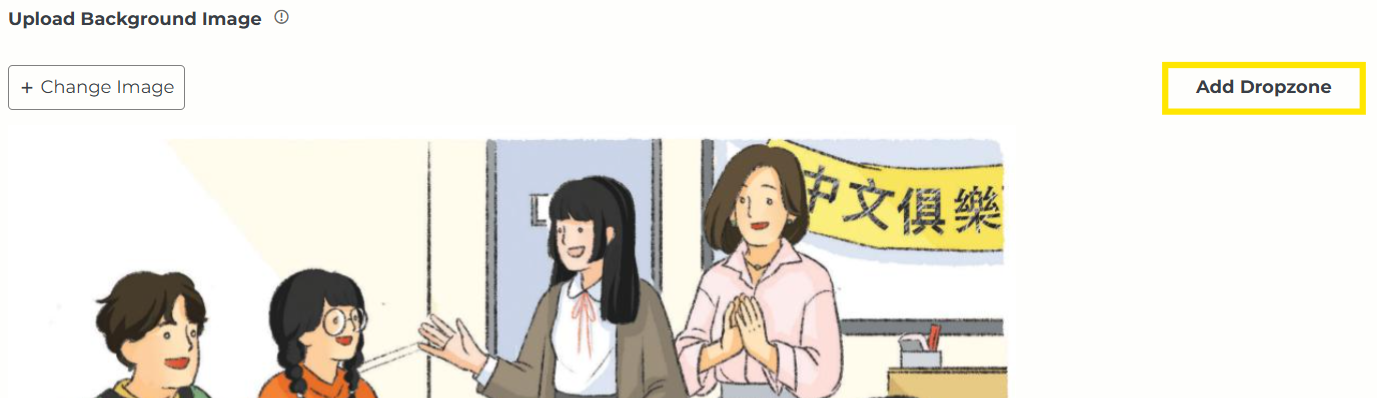
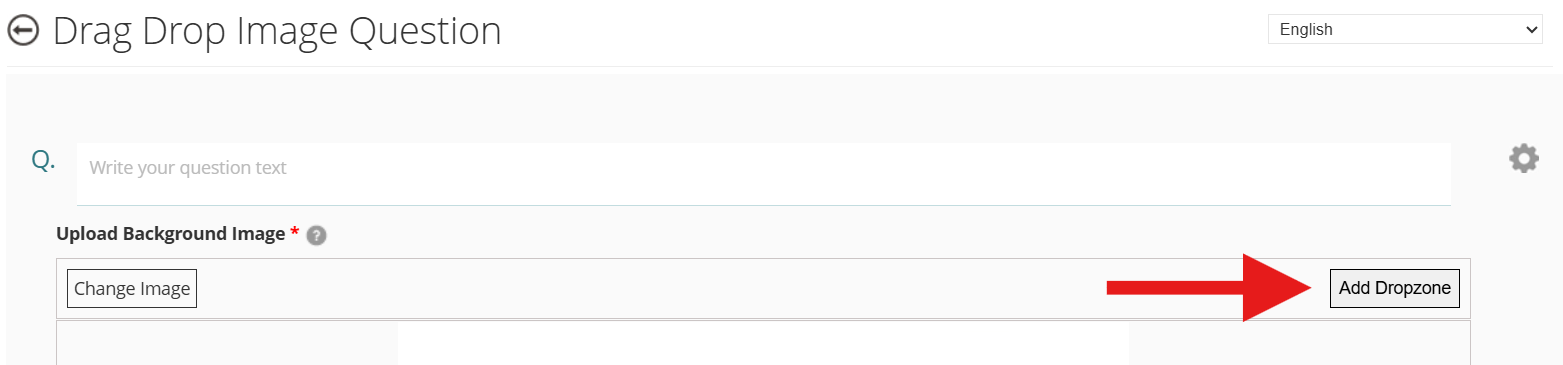
4. To add dropzones, which show students where to place draggable images on the background image, click the Add Dropzone button. Your cursor will change from an arrow to a cross.
Not what you see? Click to see the old UI view.
5. Click somewhere on the background image to add a dropzone (a white rectangle). Click Add Dropzone again to keep adding more.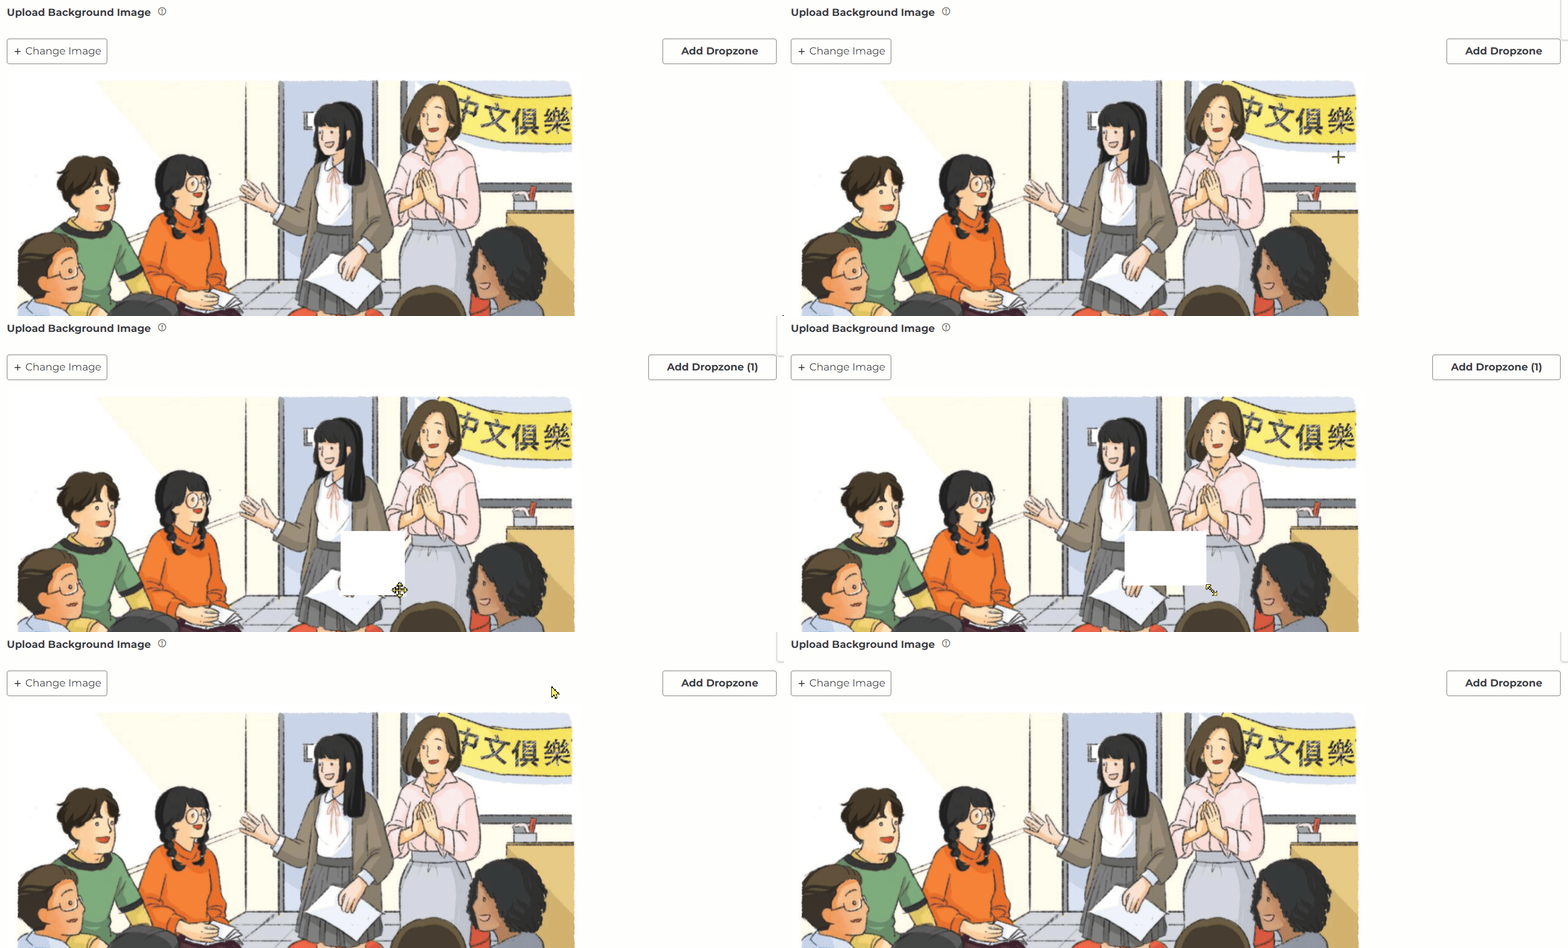
Not what you see? Click to see the old UI view.
Click and drag somewhere on the background image to add a dropzone. It will form a white rectangle. When you are done, click Add Dropzone again. If you need to start over, click Delete Dropzone.
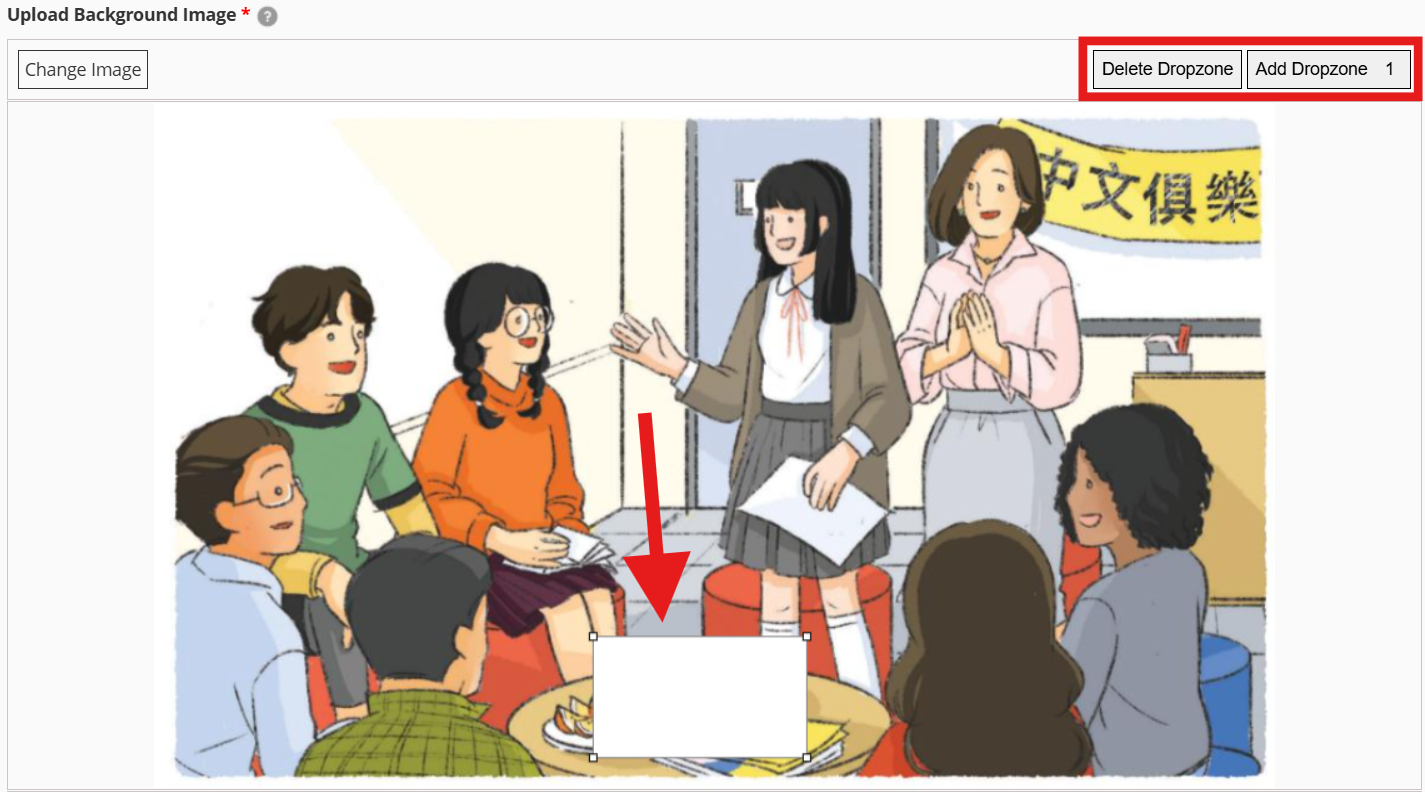
6. Continue adding more dropzones until you are done.
If you wish to remove or modify an existing dropzone, click on it to select it. When it's selected, you will see small squares appear on the four corners.
- You can click and drag the corners to adjust the size.
- Click anywhere on the selected dropzone to drag it to another area of the background image.
- Click the on the Delete Dropzone button to remove the dropzone.
7. Click Save or the check mark ✔ to save your question.
Multi-Part Questions
Comprehension Questions
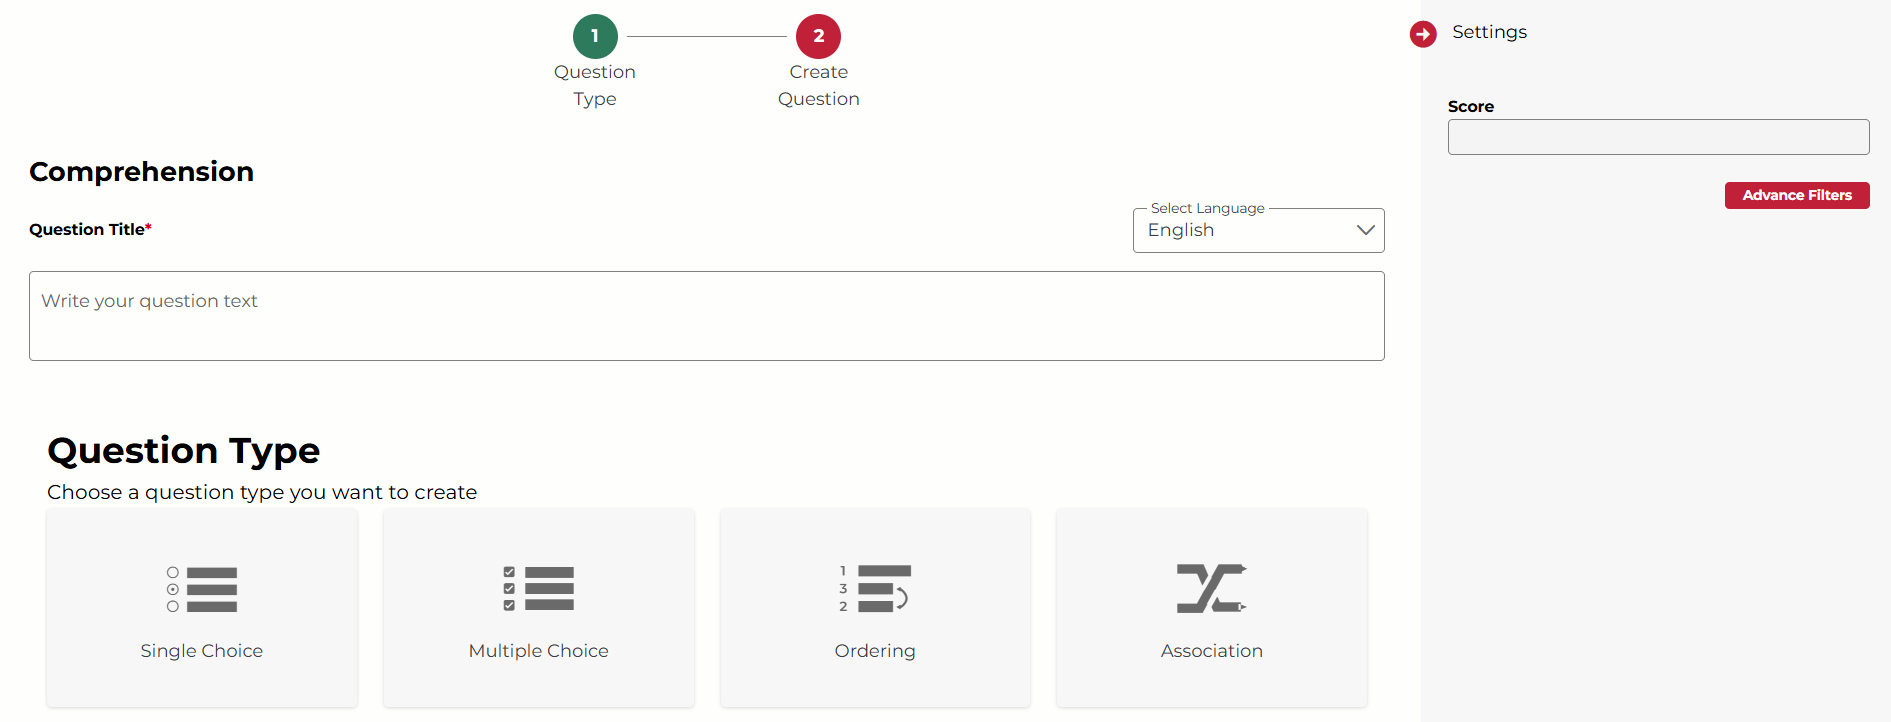
Comprehension questions allow you to create multi-part questions consisting of sub-questions. You can mix and match multiple question types within one comprehension question. For example, you could make a comprehension question consisting of two single choice questions, a fill in the blank question, and an audio recording question.
(Note: You cannot add a comprehension type question within a comprehension question.)
Not what you see? Click to see the old UI view.

1. Provide the top-level instructions for the comprehension question. Any text or media here will be visible for all sub-questions.
(Note: If your subscription includes pre-made questions, they are all Comprehension questions. This space was used only for question titles and audio files for organizational purposes. Question text and images were only added to sub-questions.)
2. Under Question Type, choose a sub-question type. Create the question, then click Save or Save & Add New when you're done.
- Save: You will return to the main Comprehension Question page, where you can either click Save to finish or Add Question to continue adding sub-questions.
- Save & Add New: You will immediately be prompted to choose the next sub-question type.
Not what you see? Click to see the old UI view.
Under "Choose a Question Type", choose your first sub-question type. Click "Save" when you're done creating the question. Now you should see the sub-question inserted into the Comprehension question. Underneath the sub-question, you can continue adding more sub-questions.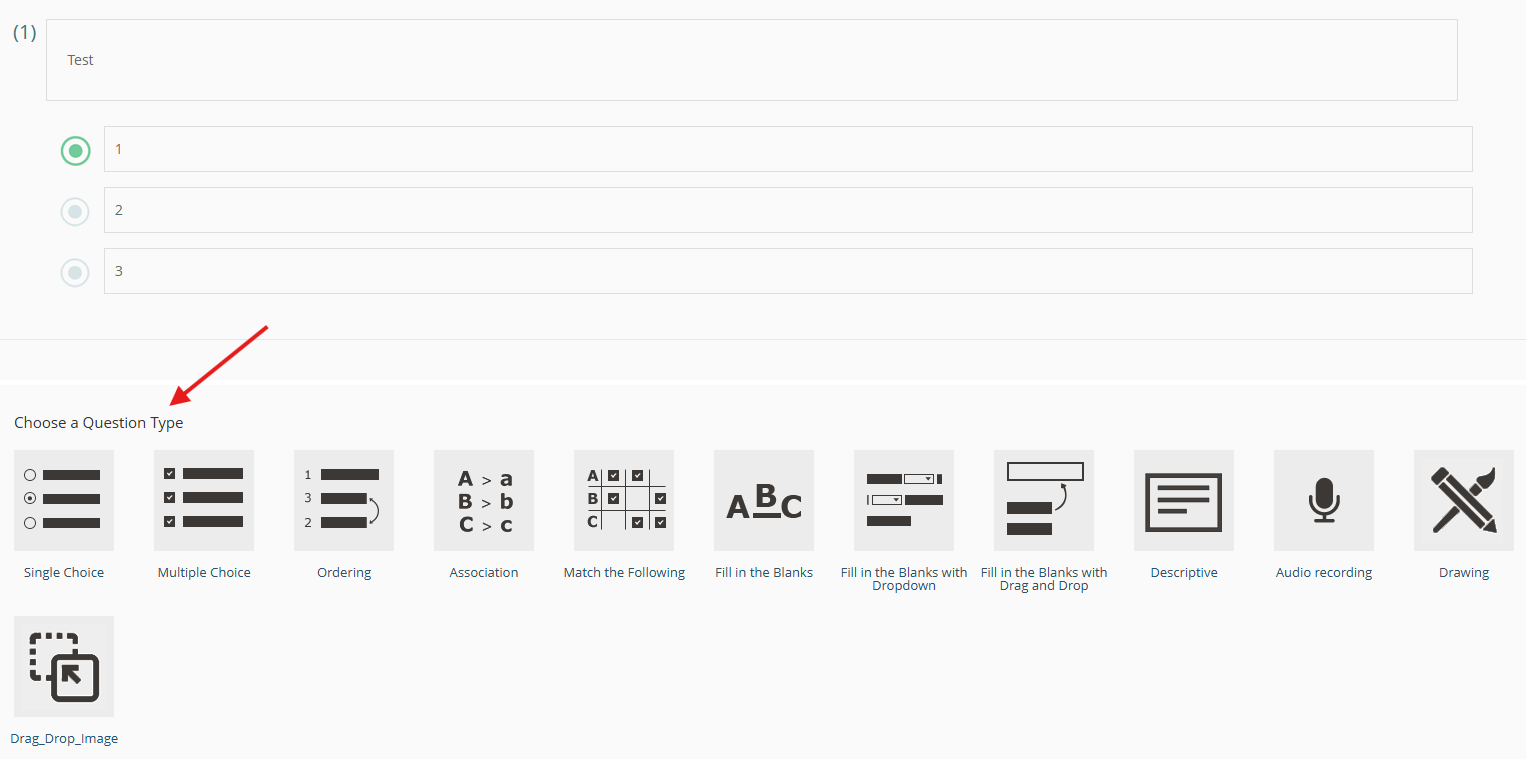
3. After adding sub-questions, you can:
- Click and drag to reorder sub-questions
- Click the + to expand sub-question content
- Click the 3 dots to edit or remove sub-questions
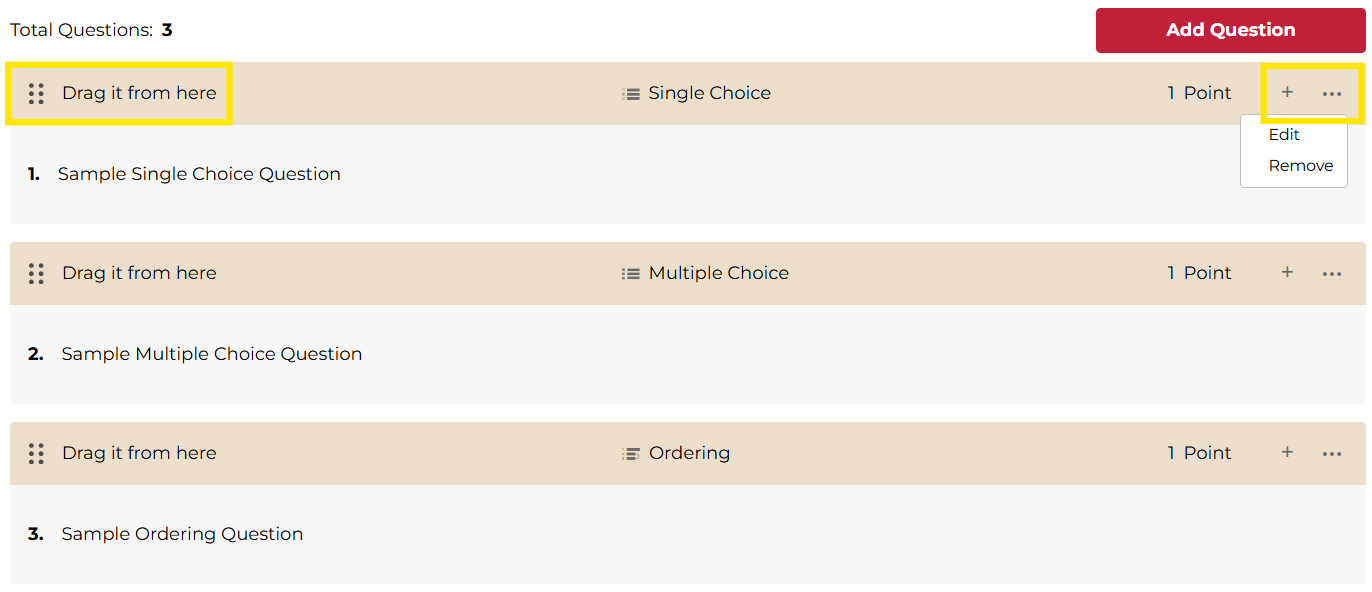
4. Click Save at the bottom of the comprehension question when you are done adding sub-questions.
Set the Question Score
Under Settings, you will see the sum total score for the comprehension question. This score cannot be edited directly, You can only edit the scores for individual sub-questions.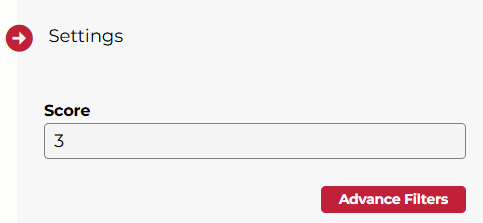
Not what you see? Click to see the old UI view.
The platform provides a default scoring as 0 for comprehension questions. Comprehension is a collection of different question types, therefore all the settings (including scores) for individual questions will be kept intact in the comprehension question.

Was this article helpful?
That’s Great!
Thank you for your feedback
Sorry! We couldn't be helpful
Thank you for your feedback
Feedback sent
We appreciate your effort and will try to fix the article